How are slider windows installed? Slider window installation involves removing the existing unit, inspecting and prepping the rough opening, setting and squaring the new slider, sealing it with proper flashing and insulation, and finishing the interior and exterior trim. The work is straightforward in concept but precision-critical in execution: a slider that isn’t perfectly square will bind, leak air, and fail seals within a few years. Most Colorado homeowners hire a professional installer because the cost of a botched install (binding sashes, water intrusion, failed warranty) exceeds the install fee within the first decade.
Ameritech Windows installs replacement slider windows across the Denver metro area and the Front Range. Request a no-pressure quote and we’ll walk through your project and what a proper install actually looks like.
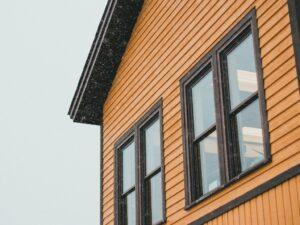
What Slider Windows Are and Why They’re Popular
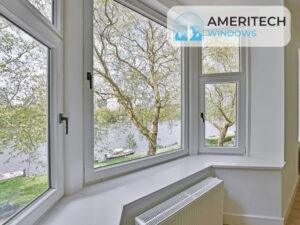
A slider window (also called a gliding window) opens horizontally along a track instead of lifting vertically like a double-hung or swinging outward like a casement. The horizontal motion makes sliders ideal for wide openings, hard-to-reach spots, and rooms where you want clean modern lines. Most slider configurations have one fixed panel and one moving panel, or two panels that both glide.
Sliders work especially well in:
- Wide wall openings where a single double-hung would feel undersized
- Over kitchen sinks where reaching up to lift a sash is awkward
- Basement egress where horizontal motion is easier than vertical
- Modern and contemporary homes where slim horizontal lines fit the architecture
- Accessibility-focused remodels where smooth horizontal motion is easier than lifting a sash
Slider Windows vs. Other Operable Styles
| Feature | Slider | Double-Hung | Casement |
|---|---|---|---|
| Motion | Horizontal glide | Vertical lift | Crank outward |
| Best for | Wide openings, modern look | Traditional homes | Hard-to-reach spots, max ventilation |
| Ventilation | Good (one or both panels) | Good (top and bottom) | Excellent (full opening) |
| Energy efficiency | Good | Good | Excellent (tightest seal) |
| Effort to operate | Light push | Lift sash up | Crank turn |
| Cleaning | Tilt-in panels available | Tilt-in sashes | Crank fully open |
If you want maximum ventilation and the tightest possible seal, a casement is the better choice. If your home is traditional and you want the look that fits, double-hung makes more sense. For wide openings, modern homes, or anywhere effortless operation matters, slider is the right answer.
Pros and Cons of Replacement Slider Windows
Pros
- Easy operation: A gentle push slides the panel open. No lifting, no cranking.
- Clean modern look: Wide horizontal glass with slim frames complements contemporary architecture.
- Good for wide openings: Sliders fit naturally in spans where a single double-hung would look small.
- Lower maintenance than tilting sashes: Fewer mechanical parts, fewer hardware failures over decades.
- Tilt-in panels for cleaning: Quality sliders include tilt-in panels so the exterior is reachable from inside.
- Affordable: For a given size, sliders typically come in below casements and on par with double-hungs.
Cons
- Track maintenance: Dirt and debris in the slider track can affect smooth operation if not cleaned periodically.
- Slightly less airtight than casements: A horizontal sliding seal is not quite as tight as a casement’s compression seal. Modern weatherstripping closes most of the gap.
- Half the opening ventilates: When one panel is fixed, only half the window opening provides airflow. Two-panel sliders solve this.
- Track-mounted hardware can wear: Cheaper sliders use lower-grade rollers and locks that wear faster than premium hardware.
Why Slider Windows Work Especially Well in Colorado
Colorado’s climate is harder on windows than most parts of the country. Sliders configured the right way handle our conditions remarkably well.
Triple-Pane Glass Holds Up to Temperature Swings
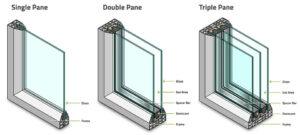
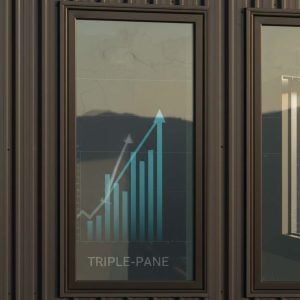
A 70-degree morning followed by a 30-degree afternoon is normal in Colorado. Triple-pane glass with two gas-filled chambers stays dimensionally stable through these swings. For sliders specifically, this matters because the seal between the moving panel and the frame is more sensitive to thermal cycling than a fixed pane. Triple-pane is the right call.
Multi-Surface Low-E for Altitude UV
Denver sits a mile above sea level, and UV intensity is roughly 25 percent higher than at sea level. Sliders often span wide openings, which means lots of glass exposed to UV. Multi-surface Low-E coatings block UV that fades flooring and furniture. On a wide slider, this is critical.
Hybrid Composite Frames Resist Warping
Sliders depend on a perfectly straight track. A frame that warps even slightly from temperature swings or moisture creates binding and air leaks. Hybrid vinyl-composite frames hold dimensional stability through Colorado’s freeze-thaw cycles, keeping the track straight for decades.
How a Professional Slider Window Installation Works
Here’s what a quality slider replacement looks like, step by step. This is how Ameritech crews install slider windows for Colorado homes.
Step 1: Pre-Install Inspection and Measurement
Before any old window comes out, the installer measures the rough opening at multiple points (top, middle, bottom for width; left, center, right for height) to confirm the new unit is built correctly. The exterior is checked for any obvious water damage, the interior trim is inspected, and the wall structure is evaluated for hidden surprises.
Step 2: Protect the Work Area
Drop cloths go down inside, the area around the window is cleared, and outdoor pathways are protected. Quality crews don’t leave a mess for the homeowner to clean.
Step 3: Old Window Removal
Interior and exterior trim is removed without damage to the wall. Fasteners are extracted, the old slider unit is freed from its rough opening, and the unit comes out as a single piece. Speed matters here because the home is briefly open to the elements.
Step 4: Rough Opening Prep
This is where corners often get cut by cheaper installers. Quality prep means inspecting the framing for rot or insect damage, replacing any compromised wood, installing or repairing flashing, and confirming the opening is square and ready for the new unit.
Step 5: New Slider Installation
The new unit is dry-fit first to confirm dimensions, then permanently set with shims to keep it perfectly square and level. Mechanical fasteners go through the frame into solid framing. The slider track must be straight or the panels won’t glide smoothly.
Step 6: Insulation and Air Sealing
Low-expansion foam fills the gap between the new frame and the rough opening on all four sides. High-expansion foam can warp the frame and ruin the slider’s smooth operation. This is one reason you don’t want a budget contractor reaching for whatever foam is on the truck.
Step 7: Flashing and Weatherproofing
Self-sealing flashing tape integrates the new slider into the home’s weather-resistive barrier. Done correctly, water that hits the wall above the window is directed away from the unit, not into it. Done badly, the next 25 years of rain and snow find a path through.
Step 8: Trim and Finishing
Interior trim is restored or upgraded. Caulking goes around all interior and exterior joints. The exterior siding or stucco is patched as needed. The slider is operated multiple times to confirm smooth motion and a tight seal.
Step 9: Cleanup and Final Walkthrough
The crew hauls out the old window, vacuums the work area, and walks the homeowner through the new unit’s operation, cleaning, and warranty terms. Documentation gets filed for the manufacturer warranty.
Why DIY Slider Installation Usually Costs More in the Long Run
Sliders look simple to install, which is why some homeowners attempt the work themselves. The reality is that the precision required to keep a slider operating smoothly for 25 years is hard to achieve without experience and the right tools. Common DIY problems we see when we replace a botched install:
- Out-of-square installation causing the panel to bind, drag, or fail to lock
- Inadequate flashing leading to water damage that shows up two to three years later
- High-expansion foam warping the frame and destroying the seal
- Failed manufacturer warranty because professional installation is required for warranty validation
- Aesthetic finish problems with interior trim, exterior siding, and caulking that age poorly
The cost of fixing these problems usually exceeds the original install fee within five years. More on Ameritech’s installation process.
What to Look For in a Replacement Slider Window
- Triple-pane glass with argon or krypton gas fill for Colorado’s temperature swings
- Multi-surface Low-E coatings for altitude UV protection
- Warm-edge spacers to reduce edge condensation in winter
- Hybrid vinyl-composite or fiberglass frames for dimensional stability
- Stainless or rolled-steel rollers rather than cheap plastic for long-term smoothness
- Tilt-in or removable panels for easy cleaning
- ENERGY STAR certification for our climate zone
- Locking hardware that operates from inside at multiple points along the track
- Manufacturer and labor warranties in writing, separately
When to Replace Your Slider Windows
- Drafts at the track when the slider is closed
- Foggy glass or visible moisture between panes (failed IGU seal)
- Sticky operation that can’t be solved with track cleaning
- Visible frame warping or rot
- Failed locks or rollers that have already been replaced once
- Higher heating and cooling bills year over year
- Aging single-pane or early double-pane glass from a prior generation
If you’re seeing two or more, replacement is usually the right call. More on when to replace.
Slider Window Installation: Frequently Asked Questions
How are slider windows installed?
Professional slider installation involves removing the old unit, prepping the rough opening, setting the new slider perfectly square, sealing with flashing and low-expansion foam, and finishing the trim. The work is straightforward in concept but precision-critical in execution. A typical replacement takes a professional crew several hours per window for a standard size.
Can I install slider windows myself?
Technically yes, but the precision needed to keep a slider operating smoothly for decades is difficult to achieve without experience. The most common DIY mistakes (out-of-square installation, inadequate flashing, high-expansion foam) cause problems years later that cost more to fix than a professional install would have. Manufacturer warranties also typically require professional installation.
How long does slider window installation take?
For a standard slider in an existing rough opening, a professional crew completes the install in a few hours. Whole-home replacements with multiple sliders are typically scheduled across one to several days depending on quantity. Custom sizes, hidden water damage, or non-standard openings can extend the timeline.
Are slider windows energy efficient?
Modern slider windows with triple-pane glass, multi-surface Low-E coatings, and warm-edge spacers are very energy efficient. Sliders are slightly less airtight than casement windows because the seal is along a track rather than a compression gasket, but the modern weatherstripping closes most of the gap. For Colorado climate, the glass package matters more than the small efficiency difference between styles.
How long do slider windows last?
A properly installed quality slider in Colorado lasts 25 to 30 years. The most common end-of-life signal is a failed insulating glass unit (visible moisture between panes) or worn-out track hardware. Cheaper sliders installed badly can fail in 12 to 15 years, often through binding panels or seal failures.
Are slider windows good for Colorado homes?
Yes, especially when configured for our climate. A modern slider with triple-pane glass, multi-surface Low-E coatings, and a hybrid composite frame handles Colorado’s altitude UV, temperature swings, and dry winter air remarkably well. Sliders are particularly popular in Denver-area homes for kitchens, basements, and modern living rooms.
What’s the difference between a slider and a double-hung window?
Sliders move horizontally; double-hungs move vertically. Sliders are usually better for wide openings, modern homes, and accessibility-focused remodels. Double-hungs are usually better for traditional architecture and tighter wall openings. Both can be configured to be highly energy efficient with the right glass package.
Are slider windows worth the investment?
For the right wall opening and the right home, yes. Sliders offer effortless operation, clean modern lines, and good energy efficiency at a competitive price point compared to other operable styles. They’re worth it when matched correctly to the room (wide openings, kitchens, basements, modern architecture) and configured with quality glass and frame for Colorado’s climate.
Do slider windows tilt in for cleaning?
Quality replacement sliders include tilt-in or removable panel features that let you clean the exterior glass from inside the home. This matters more on second-story or hard-to-access exterior installations. Always confirm tilt-in capability when comparing slider options.
What maintenance do slider windows need?
Slider tracks should be vacuumed and wiped clean once or twice a year to remove debris that affects smooth operation. The weatherstripping should be inspected annually for wear. Lubricant on the track is generally not needed and can attract dirt; if a track feels rough, cleaning is the first step. Otherwise, modern sliders are very low maintenance.
Get a Slider Window Quote in Colorado
Slider windows are a smart upgrade when matched to the right room and built for Colorado’s climate. The right glass package and a precise install are what separate a slider that operates smoothly for 25 years from one that binds in five. Ameritech Windows installs replacement sliders across the Denver metro area and the Front Range with triple-pane glass, multi-surface Low-E, hybrid composite frames, and a 40-year warranty.
Request a no-pressure quote and we’ll measure your openings, talk through the configuration that fits your home, and give you a clear, itemized proposal you can compare against any other quote.
This article was drafted with the help of AI tooling and reviewed for accuracy by an Ameritech Windows installer with 30 years of Front Range experience. Examples and recommendations reflect what we actually install in Colorado homes.
GET FREE QUOTE!
Promo Ending Soon 08-01-2026
Locally owned and operated in Colorado for over 30+ years
Minimum purchase does apply and cannot be combined with any other discounts.*
Deal is for first time customers only.**
By submitting this form, I verify that the number provided is my mobile telephone number and I provide my express written consent for Ameritech Windows to contact me at this number via phone, email, and text message (SMS) using automated dialing technology for marketing purposes. I agree to the Terms and Conditions and Privacy Policy. Consent is not a condition of purchase. Message and data rates may apply. To opt out at any time, you may reply STOP to any text message or notify Ameritech Windows by telephone.